| Issue | Possible Cause | Solutions | | :--- | :--- | :--- | | | Faulty USB cable, loose connection, or incorrect port selection. | Check physical connections, try a different USB port, or use a different cable. | | Driver Installation Fails | Conflicting software, incomplete download, or system file corruption. | Restart your PC, re-download the driver, and temporarily disable your antivirus before installing. | | Printing Garbled Text | Incorrect driver selected, communication errors. | Verify the correct Xprinter driver is selected in "Devices and Printers," and check the USB connection. | | Nothing Prints After Install | Old data stuck in the print spooler or incorrect settings. | Restart the Print Spooler service via Services app, clear the print queue, and restart your PC. |
Locate the package for Windows (supports Windows 7, 8, 10, and 11). Download the .zip or .exe installer file to your computer. Step 2: Connect the Hardware
This 2,500-word guide will walk you through everything you need to know about the XP-N200L driver, including download sources, step-by-step installation for Windows and Mac, advanced settings for label sizes, and solutions to the most common error codes.
| | Specification | | :--- | :--- | | Printing Technology | Direct Thermal | | Resolution | 203 DPI | | Printing Speed | Up to 200mm/s (or 260mm/s for the N260L variant) | | Media Width | 80mm maximum (Supports 79.5±0.5mm paper width) | | Interfaces | USB + Serial port, USB + LAN, USB + Bluetooth (optional) | | Emulation | ESC/POS (compatible with most POS software) | | Cutter | Auto cutter (Partial cut) | | Paper Loading | Easy paper loading and adjustable printing width | xprinter xp-n200l driver
Go to Control Panel > Devices and Printers.
During setup, the installer will ask for the printer series. Select or 80mm Series . Select your connection type:
Xprinter uses a unified driver package for most of its 80mm series. The driver file is typically named Xprinter Windows Driver or XP-80 Driver Setup . | Issue | Possible Cause | Solutions |
Access the CUPS web interface by opening your browser and typing http://localhost:631/ . Navigate to > Add Printer . Select the connected Xprinter from the local printer list.
: The driver is compatible with a wide range of operating systems, including Windows (XP, 7, 8, 10), Windows Server (2003, 2008), Linux , Android SDK , and iOS SDK .
Before installing the software, understanding the hardware capabilities helps ensure you configure the driver settings correctly. Direct thermal Paper Width: 80mm Print Resolution: 203 DPI (8 dots/mm) Printing Speed: 200mm/s | Restart your PC, re-download the driver, and
If using Ethernet, you will need to enter the printer's IP address. Select Printer Model: 80mm Series from the dropdown list. Click "Install" or "Apply". 3. Configure Ports & Test
This article is accurate as of 2025. Always check XPrinter’s official knowledge base for the latest driver updates and release notes.
The USB cable was plugged into a different port than the one configured during installation.
is key to a functional POS system. By downloading from reliable sources and configuring the settings in the control panel, you can ensure reliable, high-speed receipt printing.
Add Sense for Chrome works in both the build-in Sense client and in mashups using the Capabilities APIs
Charts displayed with the API through getObject and visualization.show will be tagged.
Used app(s) will be displayed in the bottom right corner.
Properties and other buttons will work just as in the client.
If your mashup shows charts from more than one app, all will be listed.
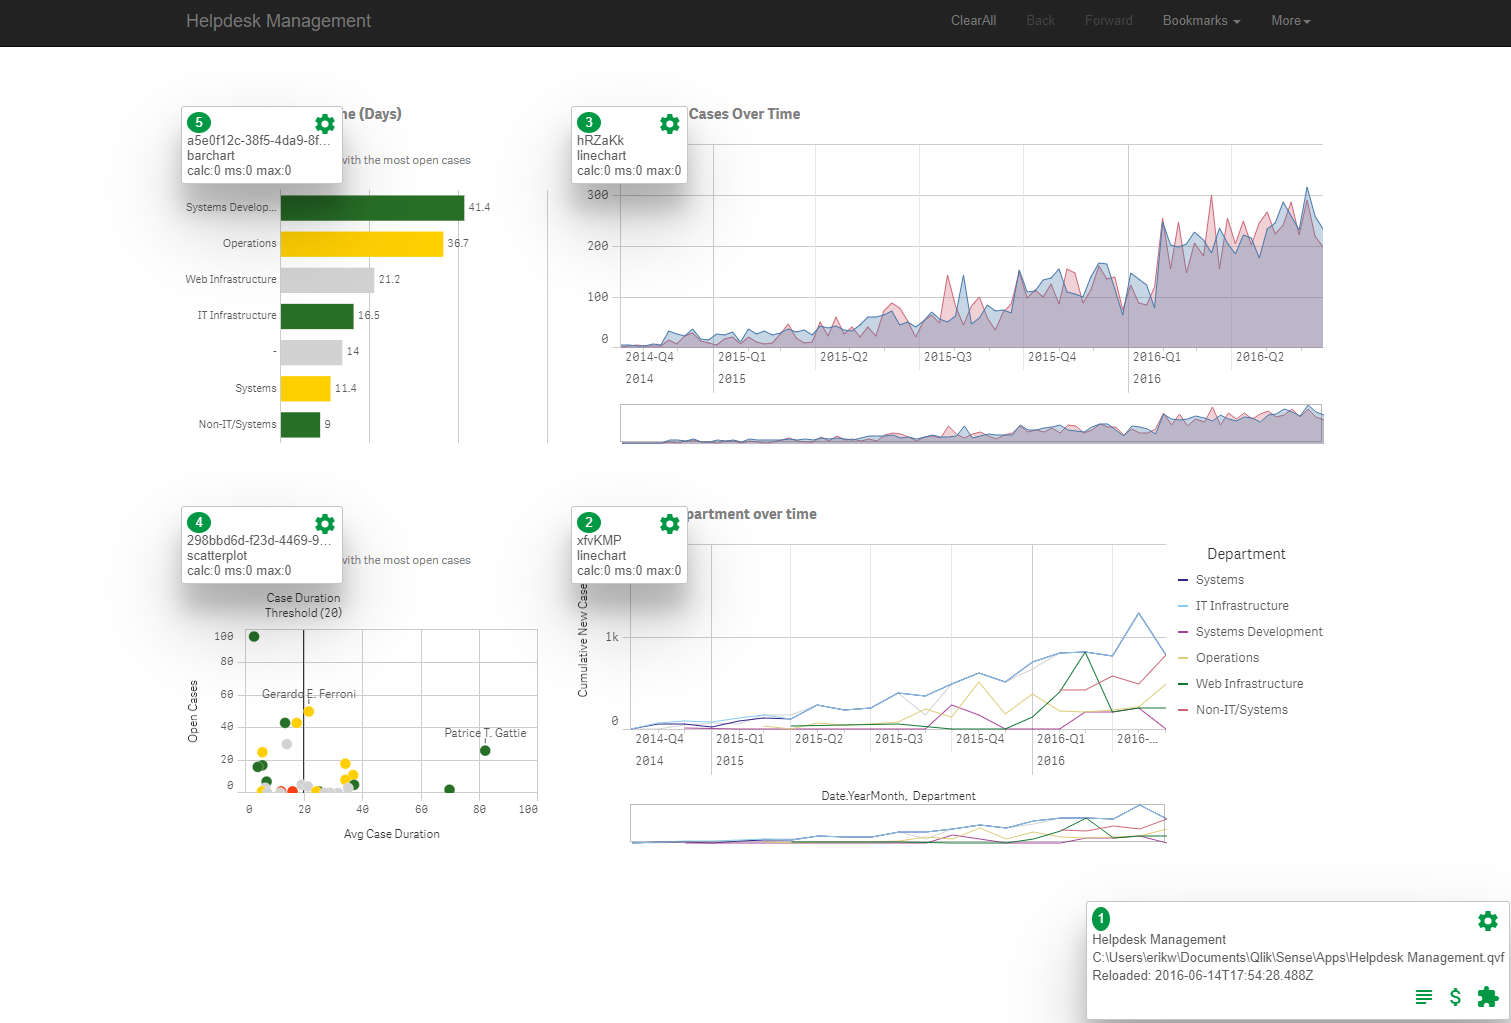
For all charts, sheets and the app you can click on the cogwheel.
That will display the properties for the object.
Use this to troubleshoot or to investigate what settings produce this chart.
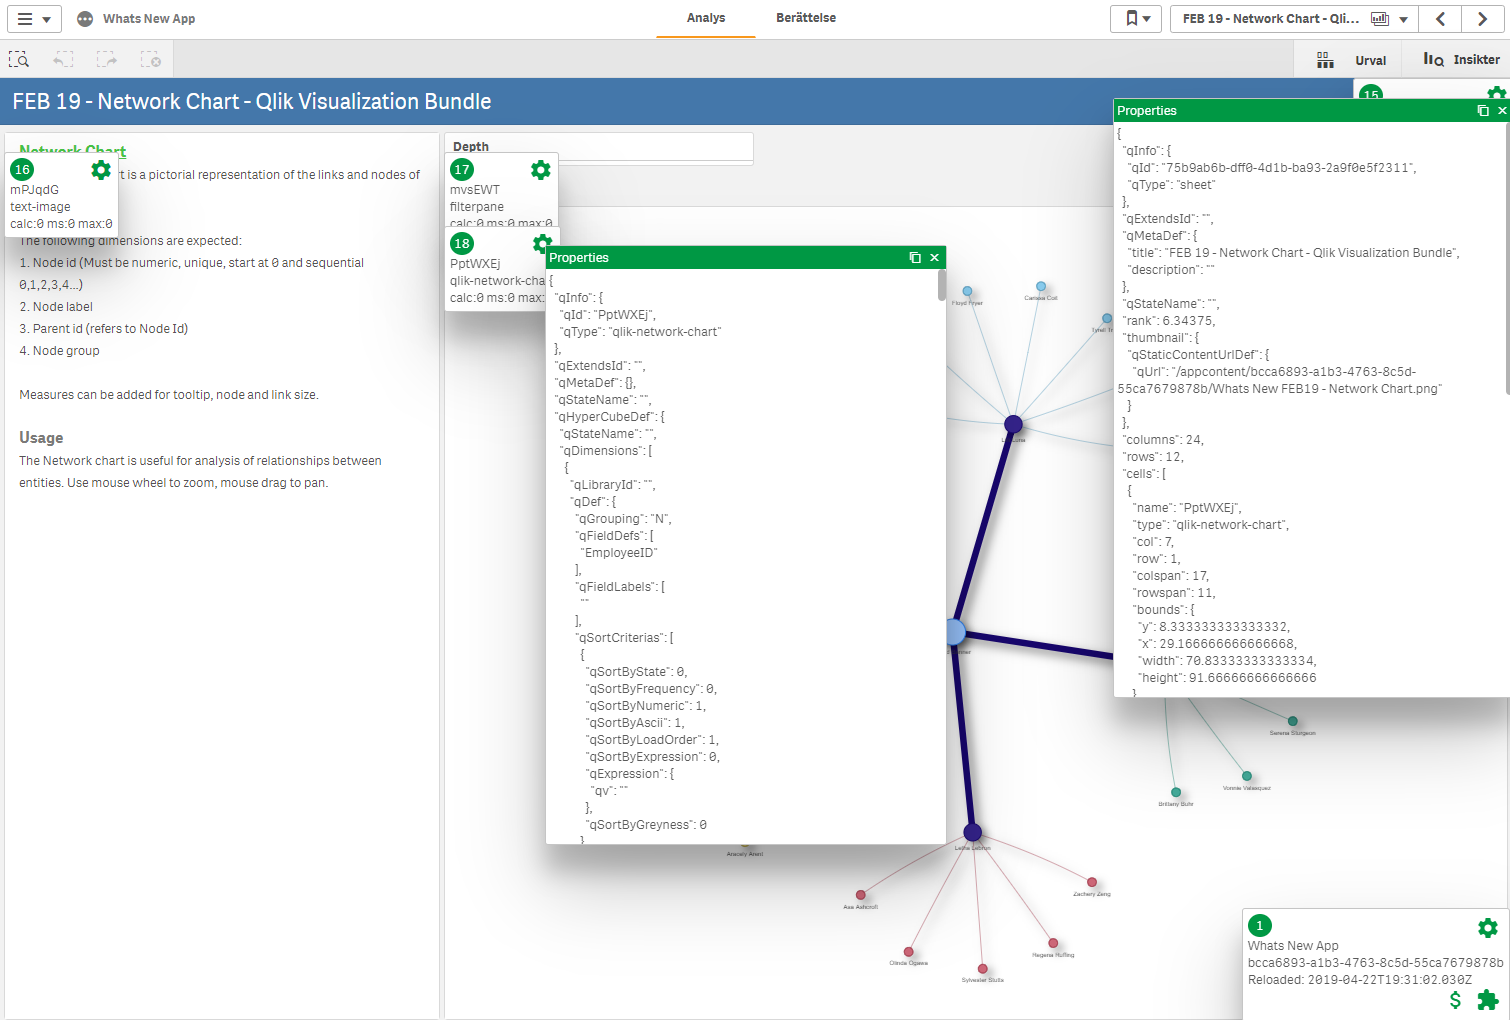
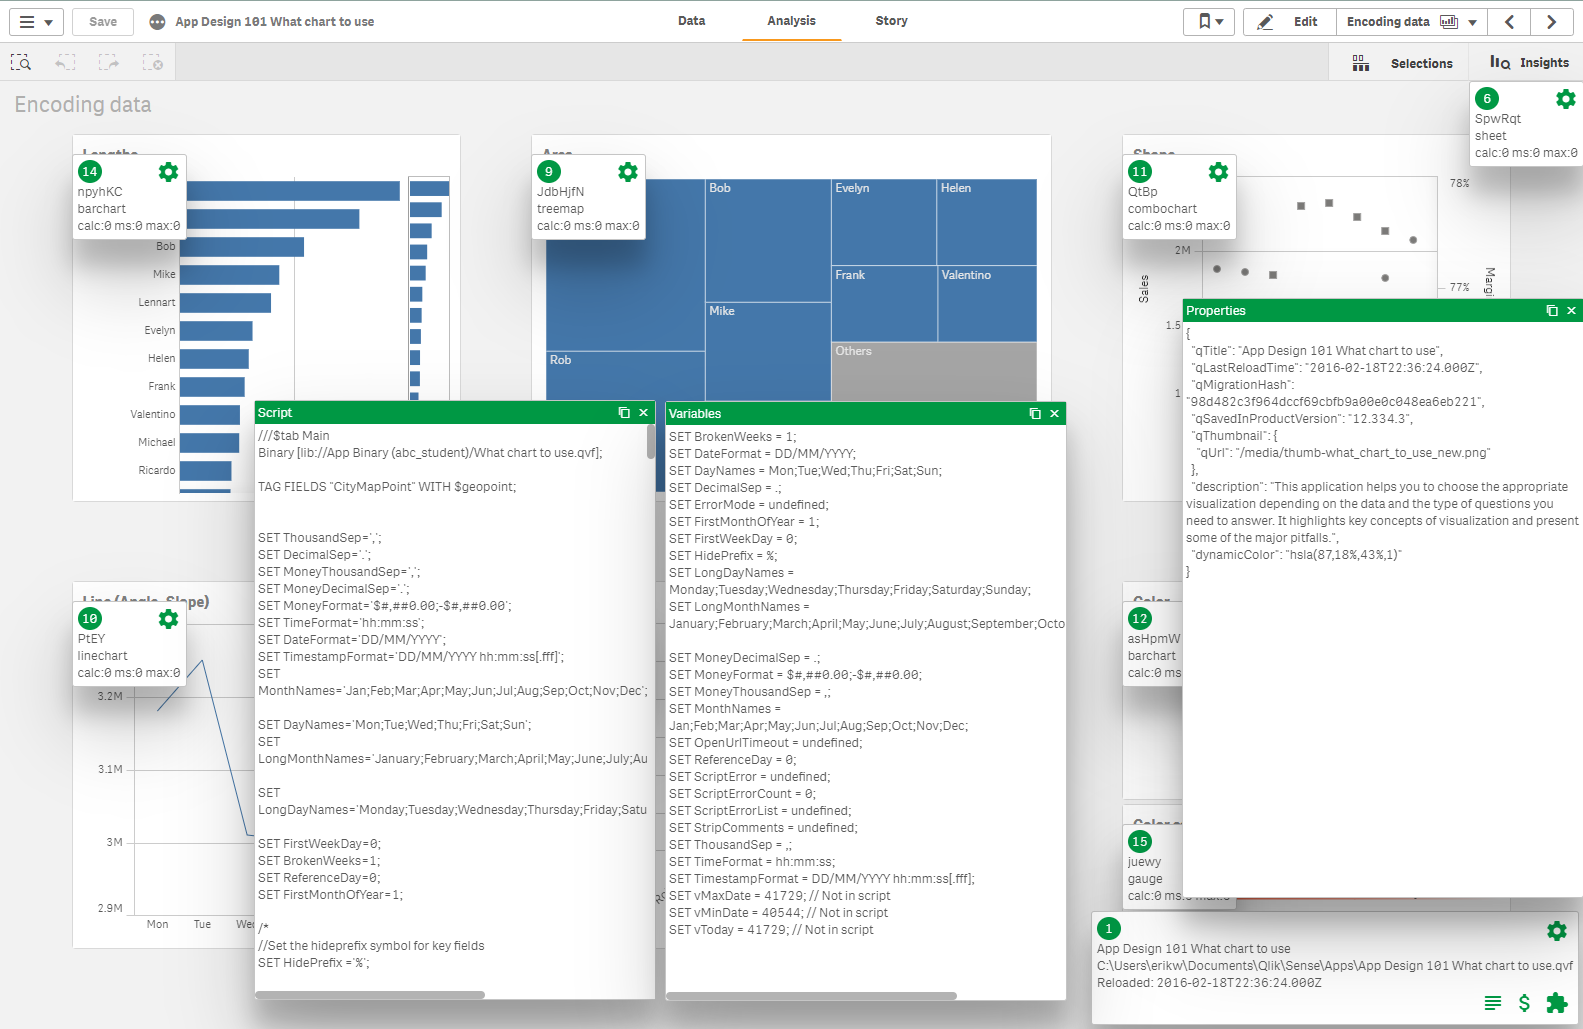
You can display several objects properties at the same time, to make comparisons.
Properties can also be copied to clipboard.
From the app box you can inspect the script, variables and app properties.
Windows can be open at the same time and moved.
You can also copy window contents, complete or partly, to the clipboard.
If you do not have access to the script the script button will not be available.
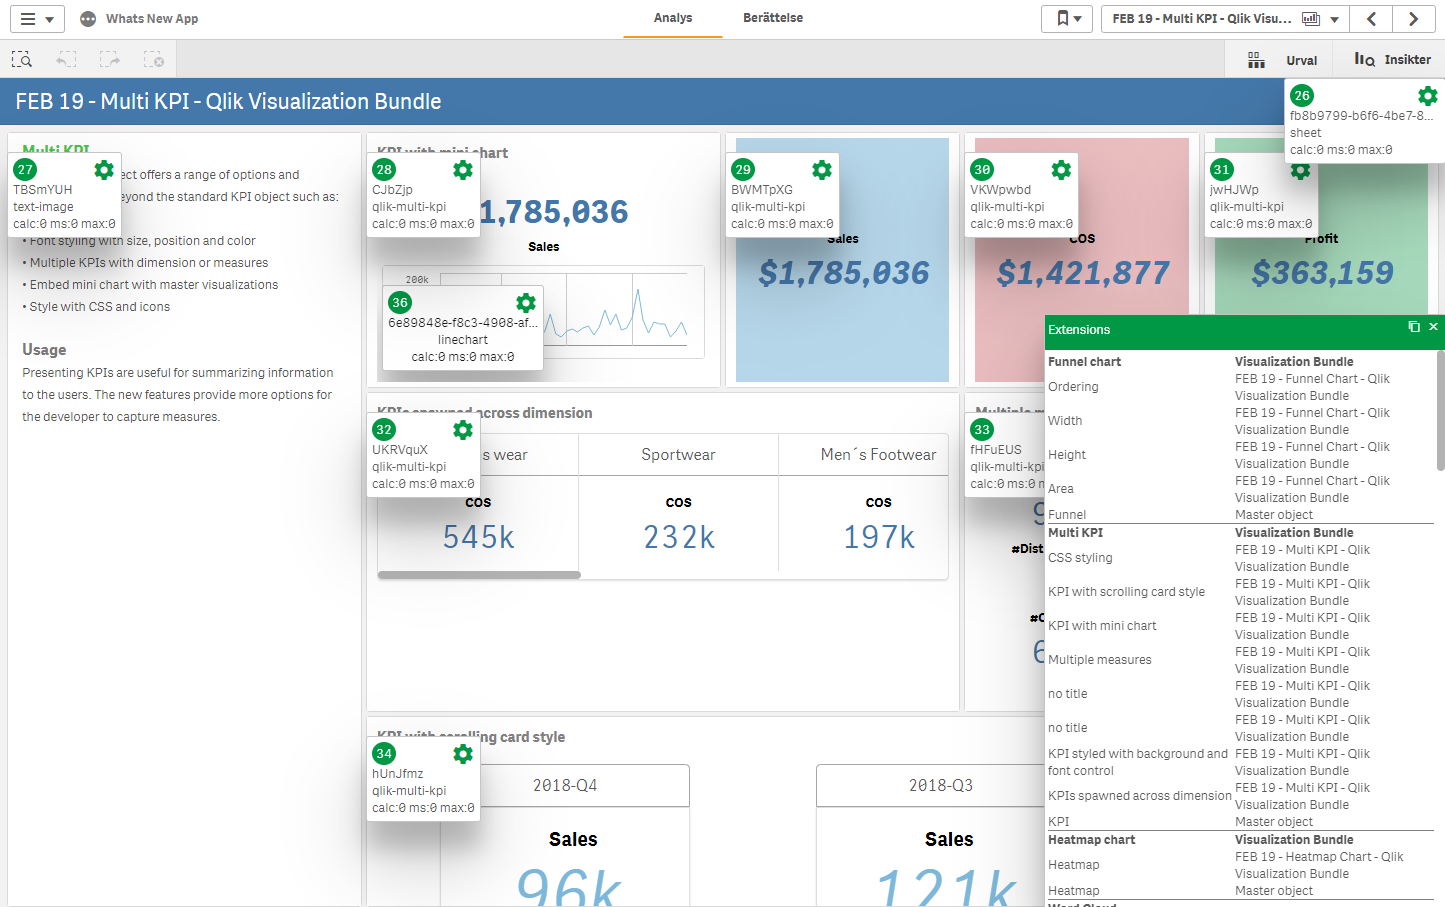
You can also easily see what extensions and charts are used in your app.
Just click on the extensions button in the app info box.
You will get a list of all axtensions and built-in charts are used in your extension, with title and sheet title
Master objects are also included.
The extension can also help you find performance problems.
When you enable the extension on a page, whether it's the standard client or a mashup, it will start recording recalculation times.
Every time an object is revalidated then extension will register time elapsed for recalculation.
It will also count how many revalidations has occured.
If the object is no longer on the screen, the extension will continue to monitor recalculations, so when you re-enable it you will get all the statistics.
